Not too long ago I decided to start the long and arduous process of making an animated short. As my current work revolves heavily around the automotive industry I'm constantly surrounded by cars. I'm not saying I've became this crazy car fanatic all of a sudden and I'm thankful that the same never happened when I worked closely with the rail industry. But the more I hear people obsess over cars and the massive role they play in our lives, I thought I'd like to feature one as the main character in my short film.
Meet Walter. He's of my own design and style and he's been a pain in the ass to get finished.
Keep scrolling for more writing.


The car is still very much 'unfinished', I plan on adding a load of fun things like air fresheners, cassettes, and fast food wrappers on in the foot-well to really add detail.
Getting Started - Optimisation Process
They say limitations breeds creativity. And since my GPU is on the verge of committing silicone seppuku, I think now is probably a good time to start getting creative. Since I'm going to be doing a lot of rendering, I need to LOD the living hell out of this. And by what better way than controlling the iterations on Turbosmooth? Well there's probably actually way more better ways to do this but this is the only one I know. When I have the finished scene ready I'll end up going slider crazy on the interface and linking different iterations to one nice scale so its easier to control. But for the mean time lets just get it working.
My plan is to go Substance mad on every asset in my scene. So this is an easy thing to produce different levels of detail for if needs be. So I devised an easy step-by-step plan of how I'm going to go from one low-res mesh to one high, whilst not messing any of the UVs up - And thankfully Substance Painter makes it super easy for you to do that.
STEP ONE - Modelling
So as you can see from the gif below I decided to test my theory out beforehand on this crudely modelled WWII tank trap(?).
I used just super basic modelling techniques on all my parts with an Edit Poly and Turbosmooth on-top with the iterations set to 2 or 3 to see what the final model would look like. I figured that since Turbosmooth doesn't do any crazy remeshing and simply just subdivides the polys that this would be safe bet for UVs.
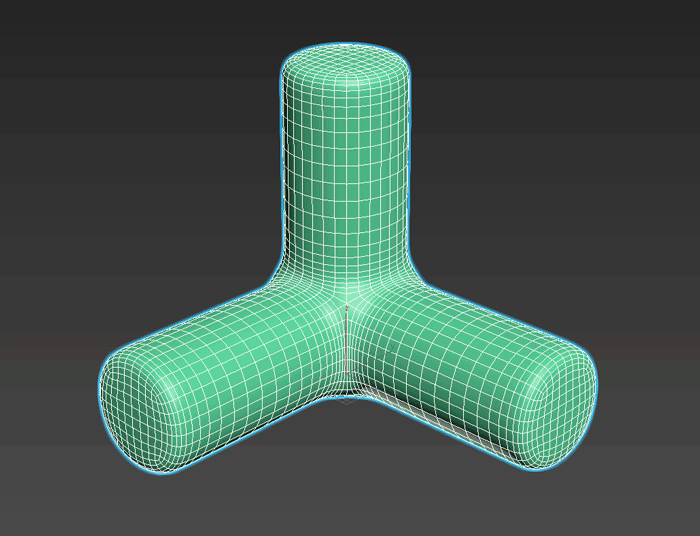
After getting the model where I wanted it, I'd turn the Turbosmooth off, unwrap it (with the Unwrap UVWs modifier below Turbosmooth), then flick it back on again. Your UVs now will work with the subdivided mesh.
STEP TWO - Duplicate and collapse

Now that your UVs look somewhat like this, it's important to note that you shouldn't go editing them with Turbosmooth turned on as it will give your CPU an aneurysm.
What you want to do now is duplicate your model and collapse the duplicated one. Now you will have two, one high res edit poly and one with a Turbosmooth on. The collapsed one is the one you're going to import into Substance Painter and the uncollapsed one is the one you will use in the end. It is possible to export the Turbosmoothed one to Substance Painter but I was having all sorts of problems with the FBX not doing what I wanted so I done it this way.
STEP THREE - Paint it up
Import your collapsed model into Substance Painter and just follow your normal painter workflow. Once you're done just export the maps and you're done.

STEP FOUR - Bring it all back

With the exported maps (and for my instance I used the VRay setting and a handy little plugin to create the material), assign the material to the uncollapsed Turbosmoothed model and there you have it. You can go up and down the iterations with it keeping the UV information nice and tidy. Don't get me wrong, it's not going to be the next internet breaking SIGGRAPH announcement but it works for optimising your scenes.
Things to consider!
Smoothing - I know that Turbosmooth will be on so your model so should automatically be smoothed out, but I've had it where I've imported maps back onto the original mesh and because the smoothing wasn't uniformly set to the same smoothing group, it was completely rubber ducked. Thankfully after playing around with Edit Normals, Smoothing Groups, and Reset XForm, I got it working fine again. Just remember that before you export anything to Substance Painter, highlight all the polys and change the smoothing group to 1. The normal maps do the work of the smoothing groups.
Symmetry - Whenever I mirrored objects or used symmetry it would flip the normals. I would only find this out after exporting the object into Substance Painter and half my model was inside out. However, Max is awesome enough for it not to tell you which way round the normals are actually facing. It will trick you and say they are facing out, then you will spend two more days tearing your air out trying to get them working. The key is to XForm the object. After you do that it will flip all the normals inside out and then you just have to flip them back again to face outwards.
Basically, if it's not working. Reset XForm.