Welcome back to another episode of "Whose Render Is It Anyway?" the show where everything's made up and the posts don't matter. That's right, the posts don't matter. Just like how relevant my degree is to getting a job.
And this week I'm writing to you guys at 9am on a Monday morning, which is a change to the usual 11pm on a Sunday night. The bad news is that this means this blog post will most likely be somewhat coherent. I do apologise.
So this week I decided to up the ante by going from one program I didn't particularly know so well (Substance Designer) to another program I don't particularly know so well. This being the marvellous, Marvellous Designer. In the past when I've tried to use cloth simulations in programs like 3DS Max or (god forbid I say it) Lightwave3D, most of my results have came out looking like a scrunched up ball of paper. But in recent years Marvellous Designer has been getting more and more credibility in the visualisation industry and not just cinema and fashion.
But I digress.
I set myself the challenge of making a chair which would have nice big curves and lots of depth to it. I wanted something that had enough plumpness to it that it could be complimented by simple lighting. Getting wrinkles and dimples in the correct places is tricky to do with mesh but can usually be faked with normals or bump maps. Using Marvellous Designer made all the mesh pull in all the right places and the amount of control you get with the materials means it's really easy to adjust what type of cushion I wanted.

Step One: Making the frame
The most simple part. Your standard 3D modelling techniques of pushing points and adding enough TurboSmooth that it smoothes out your crappy modelling. I Googled something like "modern arm chair" and had a look for something I liked. I came across a beautiful leather chair which, luckily, had the plans for on the designer's website.
And because I'm nice, I'll source that for you.
This is actually incredibly handy for myself to keep too as there is a lot of furniture on there and most of them have technical drawings attached. So from here I found the plans in a PDF which was an amazing stroke of luck because this meant I could bring them into Illustrator and then export them into 3DS Max as splines.
Pro Tip: When using plans to make something in a 3D program, ALWAYS use vectors. 3DS Max allows import of .ai files as long as you back save them to version 3 or something like that. If you have JPGs you're not going to get the accuracy you need and the 3D program you're using will most likely mipmap them to oblivion in your viewport to save memory. Just trace in illustrator and import.
Where was I?
Yeah so Edit Poly, Symmetry, Shell, TurboSmooth. Job's a good'un.
Once I had my seat made, I duplicated it and increased the inner size of the shell so it would make a base for the cushion/padding. This way I could export it out as an OBJ and import it into Marvellous Designer as an 'avatar' to then attach my patterns to.

Step Two: Designing them sweet threads
I am by no means any sort of tailor, and in fact the last time I saw a needle I passed out, hit my head off a coffee table and lost 3 hours of my memory. But when it came to making any sort of pattern in Marvellous Designer I found it to be relatively easy. In essence what you're doing is just making a template that the program fills with polys. I drew 6 points in a zig-zaggy sort of shape and before I knew it I was my very own Ralph Lauren. From then on it was just meticulous placing and sizing of the different sections and then using the 'Tack to Avatar' tool in the 3D view to pin the pattern to certain places of the chair. Don't forget to sew all the edges together either. It is a little confusing at first how it works but you just have to make sure that the lines on one seam match up with the lines on the other. (You'll know what I mean when you come to it).

There were a few times I'd go off the main pattern a bit just to make things fit. I'd make triangles and straight squares just so that everything marries up. Believe me, it does start to get a bit hectic when you're tacking things together but this is where I should have realised that I bit off a little more than my CPU could process. The less seams you have in the model the obviously less complex its going to be. I got a little lost in all the tack placing but if you persist through and everything simulates perfectly, it pays off in the end.
A lesson I learnt with this program is that you don't need to have a ridiculous amount of seams to get good results. Yes the end result looks nice and if that's what the client wants then so be it. But just with everything else in visualisation, less is more.

After everything was pinned, tacked and simulated, I put negative pressure onto the pattern so it would press against the avatar. With the fabric now being pulled in I could start deleting some of the tacks that were holding it in place. This let the fabric flop back out to its base design instead of corners awkwardly pulled a bit too far. After I made a few more minor adjustments, like making sure all of the fabric stretched around the edges of the avatar, I could then freeze it right there. Then came another unexpected laborious part that comes hand in hand with designs with lots of seams...
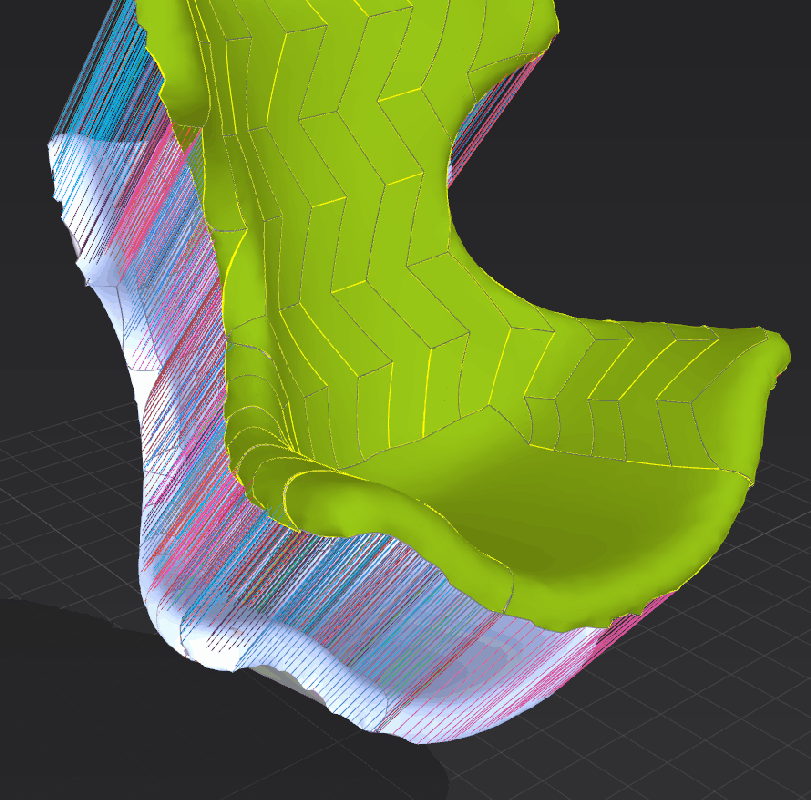
So now I had the pattern that I wanted pressed against the avatar all sewn together and pinned in place, I then had to create the rest of the fabric that was going to pillow out and create what I like to call the 'Puffer Effect'. I could have created this with the original design but that would have meant a lot more pins and a lot more hair pulling. I found that it was much more effective if I duplicated this frozen design and sew all the seams back onto the corresponding frozen design. This way I could inflate them after and the edges would be nice and tight all around the seams without having any messy pins.
Below is an example of 30 minutes of laborious sewing.

On the left is the fabric that is now frozen to the avatar and on the right is the duplicated version that has been lifted off and sewn back onto the other fabric.
Have I lost you yet?
Good!
Here's a gif to poorly illustrate what I can't articulate.

Say it ain't sew.
After that had unexpectedly gone according to plan, I then had to mess around with some fabric settings (which might I add that I had no clue what I was doing. But does that surprise you, honestly?) to get said Puffer Effect.
So these terms probably have very elaborate sciences and algorithms behind them to fully explains how they operate. However, I'm going to try my best today to explain in my terms, Daveman's Terms if you will, how they work.
Stretch-Weft:
Controls how much it pillows from the edges. For example, if you lower the value the fabric will pillow around the edges but not so much from the centre. Probably.
Stretch-Warp:
Controls the overall pillowing and tightness of fabric from the centre. i.e. The lower the value the more it looks like a balloon.
Shear:
How far the fabric will expand/stretch. (This one is correct, I'm sure)
Bending-Weft:
Not really sure but it seamed to do something with the creases.
Bending-Warp:
Yeah I actually don't know what this does either.
Buckling Ratio-Weft:
Or this for that matter.
In fact, lets just scrap this idea. I only played with the first three anyway.
Anyway, after a bit of playing with the sliders and increasing the pressure I got something like this...
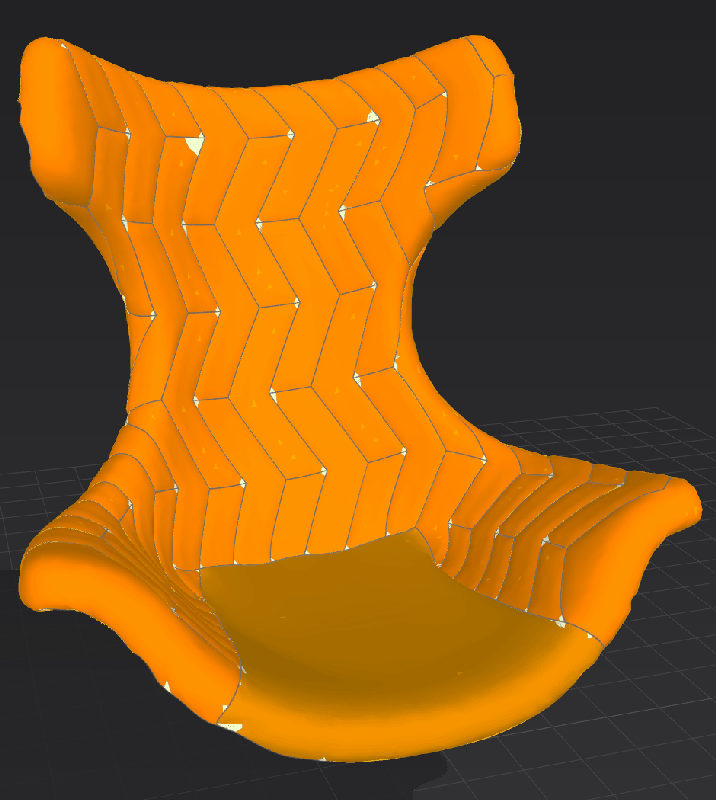
I was just proud that I was able make this loop.
So now that I had something that I thought could be acceptable enough to put on my website without being ridiculed, it was time to delete the frozen mesh behind and export this baby out as an OBJ and get it back into Max.
Remember that before importing it back in, select the entire fabric and change the particle size down so you get a better resolution. Usually I work with around 20 when running simulations and then 10 for when I export it. You can go lower if you like but it's just as easy to apply a TurboSmooth and change the iterations once in Max, that way you have much more control.

Be careful when importing it back into 3DS Max. It doesn't like to keep the ratios and will turn things from imperial to metric and visa versa. So just make sure that everything is corresponding correctly and if so it should import bang on. Like thus.
Step 4 or something: Refining Details
Now that we have everything in, it's time to do some spring cleaning. I found that the soft selection tool was super useful when needing to do a bit of nip-tuck on my mesh. I also found that making smaller selections actually ruined some of the mesh because I was pulling smaller areas around and it created this weird wobbly look that didn't look authentic at all. Instead I increased the area so I was dragging a lot more mesh around which looked so much better.

With the cushioned area that I used as the avatar in MD, I increased the segments in the shell to make it a bit sharper around the edges and just pulled it in a bit. This way I could use this as sort of a buffer between the frame of the chair and the fabric for if I needed to hide any loose polys. Apart from the adding of materials , the chair is pretty much done now. For one last bit of extra detail, that actually helped quite a bit, I added a cylindrical 'seam' just under where the fabric tucks in. I done this by selecting a loop of edges on the padding and used the "Create Shape from Selection" tool in the Edit Poly modifier. This really helped me to make the seams of the fabric tuck in at a consistent level all the way round the cushion. Of course it also helped to hide a few corners and unwanted open polys.

Now that I was done I could render to my heart's content.
But there is one more thing. One little secret that I didn't share with you. The true power of MD can really come into its own on this occasion and it's one wonderful oversight that you should never take for granted.
UV Maps.
Yes friend.
It has them, it has them all.
You see, because we/you/I made everything from flat patterns, they're already UVed. UVed in one big beautiful 1 to 0 square. And because theyre all set up, you can go ahead and apply any terrible texture maps you like to it. Like I did.
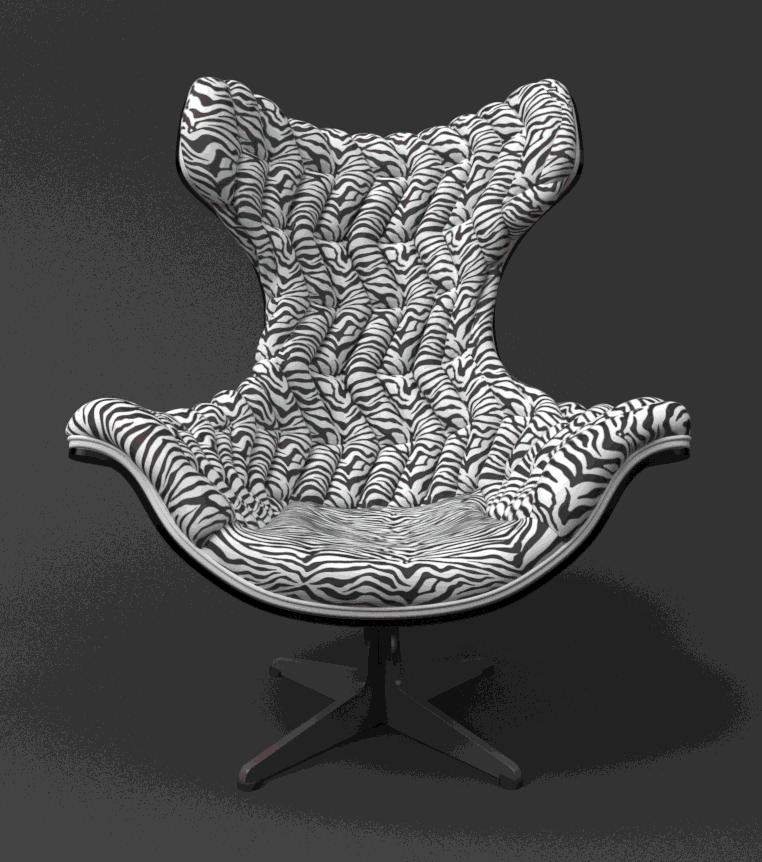
Don't stare too long, it'll hurt your eyes.